

How To Deploy To Google App Engine
Deploying a Flask app to Google App Engine
This post covers how to deploy a simple Python/Flask app to the App Engine Standard Environment. I've done this many times, but I still sometimes forget a step, so I put together this blog post for future reference. It's essentially my annotated version of the Quickstart for Python 3 in the App Engine Standard Environment. I hope it's useful to you, too!
About App Engine
App Engine launched in 2008, as one of the first platform as a service (PaaS) offerings. From the very beginning, it allowed developers to run their Python apps on Google's cloud infrastructure, and now after 12 years of evolution App Engine offers preconfigured runtimes for many popular programming languages, as well as the App Engine Flexible Environment, which allows you to deploy your own runtime environment to support nearly any language or platform.
App Engine Standard is a great choice for when you have a wide range of possible loads for your app or service and want to keep costs low. You only pay for what you use, because the App Engine platform will automatically scale down to zero instances (and therefore zero cost) when there is no traffic at all, but it will also scale up to thousands of instances if needed when your app goes viral.
Note that App Engine Standard uses pre-configured sandbox environments, such as the Python 3.7 Runtime Environment used in this example. If you need more control of the details of the runtime environment, Cloud Run or App Engine Flexible Environment may be better choices.
For an overview of the differences between the Standard and Flexible App Engine environments, see Choosing an App Engine environment.
Writing a simple Flask app
Let's write a Flask app that we can deploy to App Engine. Our example is trivial — just a home page and two other pages, with links between them — but if you have a Flask app already written that you'd like to deploy, you can skip this section and deploy your own app instead of this simple example.
Installing Python. I'm going to assume that you already have Python 3.x installed. Our app will be deployed in a Python 3.7 runtime, but for this example your local Python version doesn't matter as long as it's 3.6 or above.
Virtual Environments. Using a virtual environment is recommended; if you're not familiar with virtual environments, here's a primer.
Installing Flask. To install Flask, use the pip install flask command. Flask is the only package we'll be using in this example.
Writing the app. The sample will include two files: a Python source code file, and an HTML template file. The first step is to create a project folder to include these files.
Within the project folder, create a main.py file and copy this code into it:
Then create a templates under your project folder, and with that folder create a index.html file and copy this into it:
We'll use this sample app to learn how to deploy to App Engine. Our sample is a trivial do-nothing app, but the steps for deploying to App Engine would be exactly the same for a large application with many source files, templates, or other resources. We're using Python in this example, but the deployment process also works the same for any other language supported by App Engine Standard, including Java, Node.js, PHP, Ruby, and Go.
NOTE: If you're using these instructions to deploy an existing application, you may have dev/test resources under the project folder that shouldn't be deployed to App Engine. Instructions for managing what gets deployed or not can be found in the gcloudignore documentation.
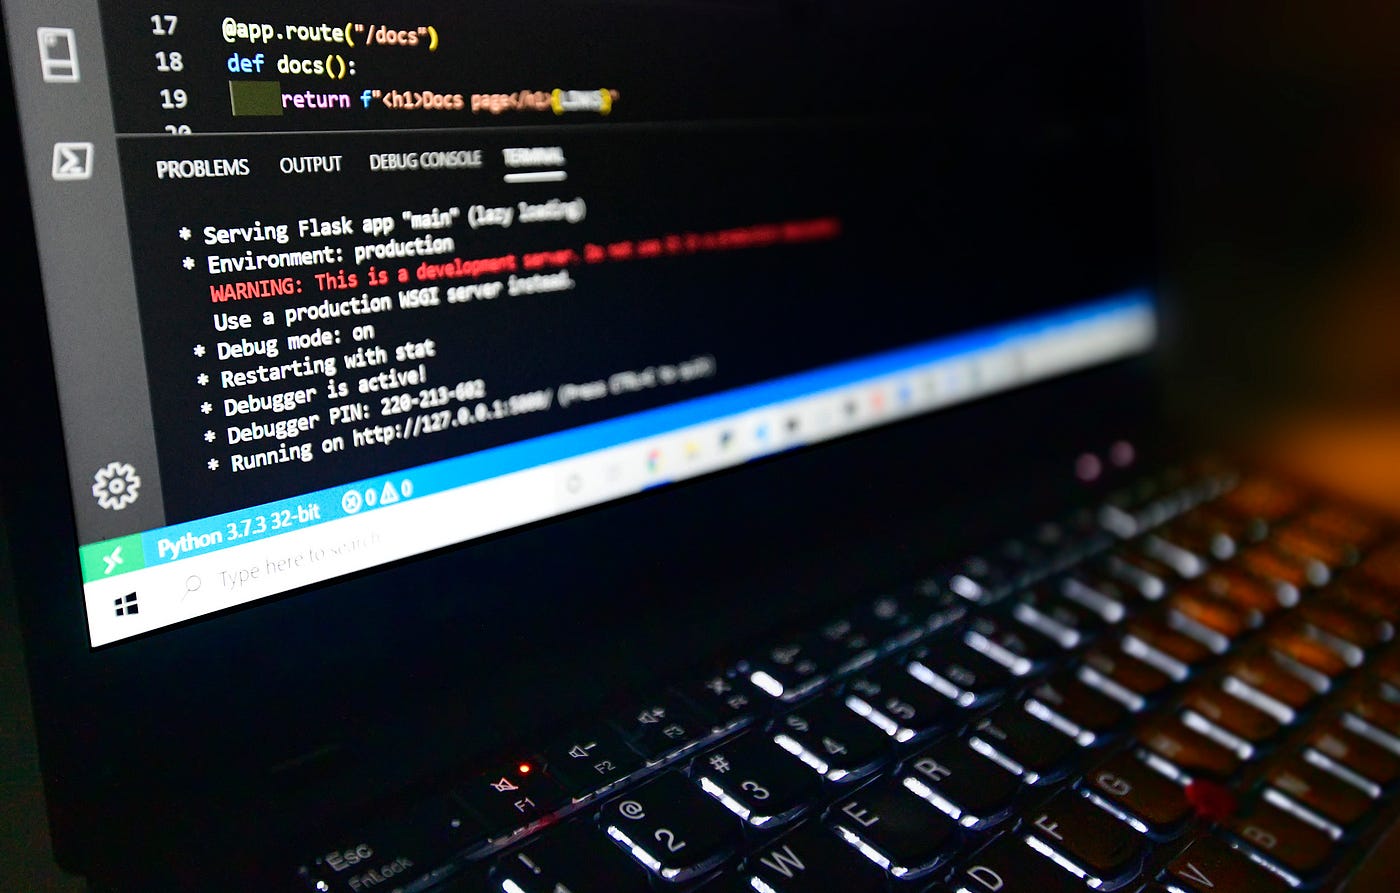
To verify the app is working, run it locally and point your browser to 127.0.0.1:5000 as shown below.

NOTE: if you use VS Code (as I do), install the Code Runner extension to enable running the current Python source code file with Ctrl-Alt-N.
Getting set up to work with Google Cloud
Before we can deploy our simple app to Google Cloud, we need to create an account, install and configure the gloud CLI, and install the App Engine extension.
Create a Google Cloud account. If you don't already have one, you can sign up for the GCP Free Tier and get a free $300 credit for trying it out.
Install the gcloud SDK/CLI. The gcloud command-line tool gives you the ability to create and manage App Engine apps as covered in the post, but that's just the tip of the iceberg. It is the primary CLI for all of Google Cloud, and you can use it for everything from creating projects, storage buckets, and database instances to managing complex Kubernetes deployments. My colleague Gabe Weiss has a simple overview of installing and configuring the SDK that covers how to get started, and I also recommend the rest of that post for some nice tips on working with Pub/Sub in GCP.
Install the App Engine extension. The gcloud CLI has many optional components, and for this post we're going to use the App Engine extension to deploy our app. After you've installed the CLI, use this command to install the extension:
gcloud components install app-engine-python Deploying to App Engine
OK, we have an app and we're ready to deploy it! Here's a high-level view if what we're about to do:
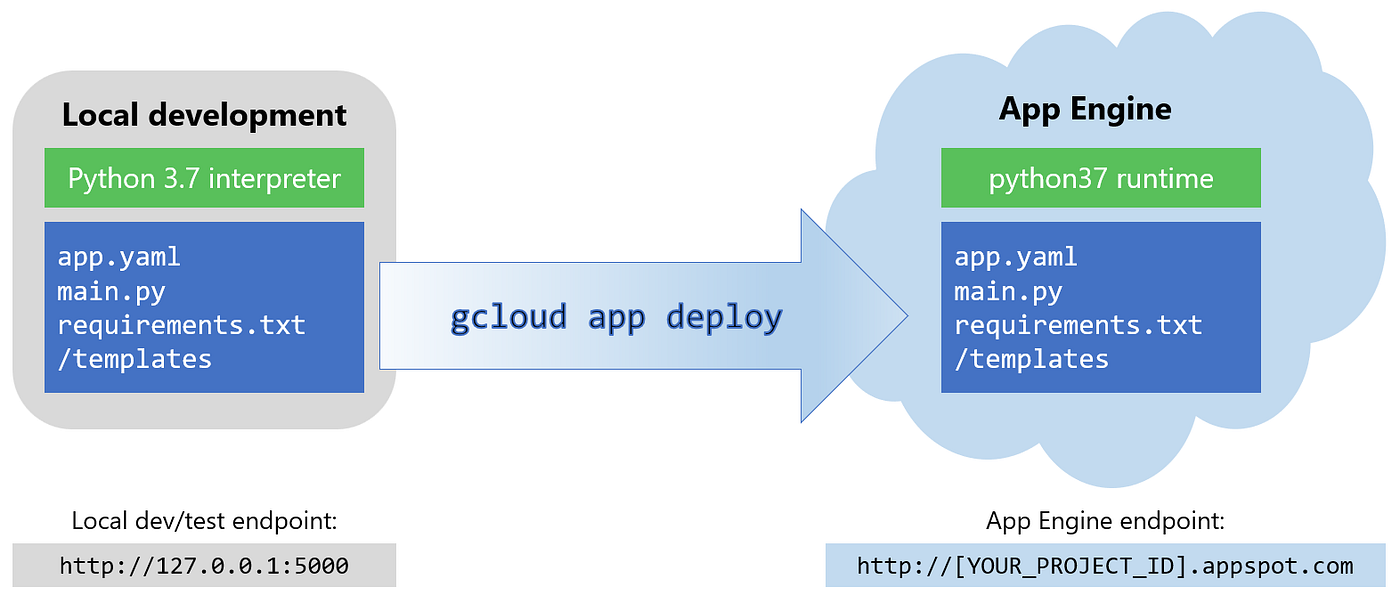
You'll notice there's only one file listed there that we haven't created yet: app.yaml. This is a small configuration file that tells App Engine what runtime we want to use, as well as some other optional information. In our case, we're going to go with the defaults on pretty much everything, so our app.yaml file just needs a single line of text that specifies the runtime:
runtime: python37 Create an app.yaml in the project folder containing that line, and we're ready to deploy our app.
NOTE: our sample has an entry point named main:app for the Flask app, which is the default for Python apps on App Engine. For information about how to change this, or other configuration options, see the app.yaml reference documentation.
If you followed Gabe's instructions for configuring the SDK, you've already created a project that we can use for this example. Otherwise, you can quickly create a new empty project as covered in Creating and Managing Projects.
Next, set the project as your gcloud default with this command:
gcloud config set project MY-PROJECT-ID NOTE: you can combine the project creation and setting of gcloud default into a single step with this command if you prefer:
gcloud projects create MY-PROJECT-ID --set-as-default We also need to enable billing for the project, as covered under How to Modify a Project's Billing Settings. This simple example is well within the free tier, so it won't cost you anything, but you still need to have billing enabled before deploying to App Engine.
NOTE: if you prefer to use the command line for everything (as I do), you can use the gcloud beta billing accounts list command to get a list of your billing accounts, then copy your account ID to the clipboard and paste it into this command to enable billing on your project:
gcloud beta billing projects link MY-PROJECT-ID --billing-account MY-ACCOUNT-ID When we deploy to App Engine, the Cloud Build API is used to create a container based on the metadata in the app.yaml and requirements.txt files. So we need to enable the Cloud Build API. Here's the command to do that:
gcloud services enable cloudbuild.googleapis.com And as a final step before deploying, we need to initialize App Engine for our project, using this command:
gcloud app create --project=MY-PROJECT-ID We're ready to deploy! Here's the command to deploy to App Engine:
gcloud app deploy If all goes well, you'll see console output similar to the following:
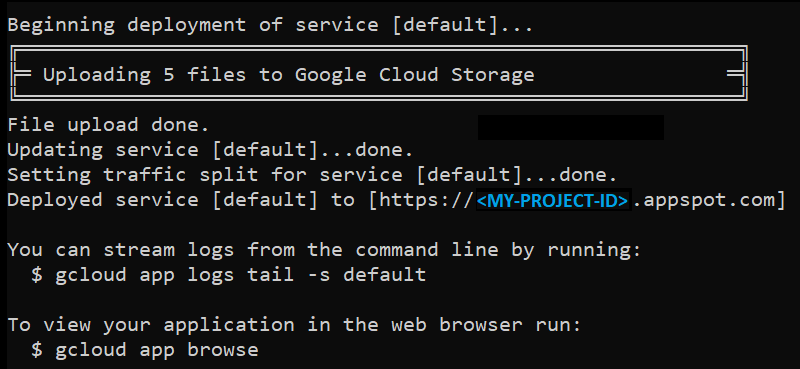
The app is now running on App Engine. To see it deployed there, you can either navigate to the deployed service URL shown on the console, or type gcloud app browse to launch it in your default browser:

The deployed application is a container running on the Google Cloud infrastructure. If you're curious about how that works, How Instances are Managed is a good place to start. But the beauty of App Engine is that you don't need to understand or think about that implementation detail. You can just write an app, create an app.yaml file, type gcloud app deploy, and magic happens.
Ignoring Files
By default, everything in your project folder will get copied into the deployed container. If you have files or subfolders that aren't needed in the deployment, you can list them in a .gcloudignore file to tell App Engine to ignore them. The syntax is the same as what's used in .gitignore files , and you can view help information with this command:
gcloud topic gcloudignore Cleaning Up
Use this command to delete a project when you don't need it any longer:
gcloud projects delete MY-PROJECT-ID Deploying to App Engine Standard is a quick and simple way to run Flask projects in the cloud. The example shown here is a trivial app, but all of the deployment steps are exactly the same for a complex app or any other service, such as a REST API.
How To Deploy To Google App Engine
Source: https://medium.com/@dmahugh_70618/deploying-a-flask-app-to-google-app-engine-faa883b5ffab
Posted by: landersseentrusted83.blogspot.com
0 Response to "How To Deploy To Google App Engine"
Post a Comment